Getting Started
Every Django application starts with a project. This guide shows you how to create and set one up.
Project and Apps
A Django project is the overall configuration and collection of apps that together form your web application. You can think of it as a “container” that organizes everything and connects the pieces.
An app is a self-contained Python package that handles a specific function of your project – for example, a payments module, a poll system, or a user authentication module.
Apps and Django Philosophy
Django is built around the idea of modularity and reusability. Instead of treating your project as one large codebase, Django encourages you to split it into smaller, self-contained components (called apps), making projects easier to develop, scale, and maintain.
A project can consist of multiple apps working together, and an app can even be reused across different projects. This design makes it easier to maintain, extend, and share code.
Creating a Django Project
To create a Django project, use the following command:
# This creates the project inside the directory called learn_django
# (This requires learn_django directory to exist)
django-admin startproject my_site learn_django

# OR

# This creates the project in the current directory
django-admin startproject my_site .

# OR

# This creates the project inside a directory called my_site
# (This also creates the directory and my_site can't already exist)
django-admin startproject my_site
WARNING
Avoid naming your project after built-in Python or Django components, such as django or test, because this can cause conflicts.
Project Structure
The new project structure looks like this:
learn_django
├── manage.py
└── my_site
    ├── __init__.py
    ├── asgi.py
    ├── settings.py
    ├── urls.py
└── wsgi.py(learn_django might be my_site if you used the 3rd command above)
manage.py: A command-line tool for tasks like running the server, creating apps, and applying migrations.my_site/: The inner directory is the actual Python package for your project. This is the name you’ll need to use to import anything inside it (e.g.my_site.urls).settings.py: Settings/configuration file for your Django project. This is used for database setup, installed apps, middleware, templates, etc.
urls.py: This defines the URL patterns for the Django project, serving as the table of contents for your website.
asgi.py: An entry-point for ASGI-compatible web servers to serve your project (for async support).wsgi.py: An entry-point for WSGI-compatible web servers to serve your project (traditional deployment).
Database
Django ships with SQLite database and by default the settings.py is configured to use it. However, Django also supports many other databases, which are discussed in detail later on this page.
SQLite is convenient for development and testing, but it is not recommended for production environment because it lacks the scalability and robustness required for high-traffic applications.
Migrations
In Django, migrations are how the framework keeps your database schema in sync with your models. They are essentially version-controlled instructions for creating or modifying database tables.
Even if your new Django project has no custom models yet, you should still run the initial migrations to set up the database with all the built-in tables Django requires. These include:
- Authentication system: Users, groups, permissions
- Admin interface: Session management, log entries
- Content types: Tracks installed models for permissions
- Migrations table: Tracks which migrations have been applied
To run initial migrations, change into the Django Root directory, This is the directory where manage.py file exists, and run this command:
python manage.py migratepython manage.py migratepy manage.py migrateDevelopment Server
Django also includes a development server, a lightweight Python-based web server that lets you run your project locally, test changes, and see your site in a browser without needing a full production server.
WARNING
The development server should not be used in a production environment, as it is intended only for development and lacks the security, performance, and robustness required to safely handle real-world traffic.
To start the development server, run the following command:
python manage.py runserverpython manage.py runserverpy manage.py runserver(Your website should now be accessible at http://127.0.0.1:8000/.)
Automatic reloading
The development server automatically reloads Python code for each request as needed. You don’t need to restart the server for code changes to take effect. However, some actions like adding files don’t trigger a restart, so you’ll have to restart the server in these cases.
To see the available options for the runserver command, such as running on a different port, check this section in the official Django documentation.
Creating a Django App
To create a new app, use the following command:
python manage.py startapp my_apppython manage.py startapp my_apppy manage.py startapp my_appApp Directory Structure
The new project structure looks like this:
my_app
├── __init__.py
├── admin.py
├── apps.py
├── migrations
│   └── __init__.py
├── models.py
├── tests.py
└── views.pyadmin.py: To register and manage Django models through admin panel.apps.py: Configuration for the app to define metadata such as the app’s name.models.py: To define Django models and its fields. Each model typically maps to a database table.tests.py: To write automated unit tests or functional tests for your app.views.py: To define Django views that handle HTTP requests and return HTTP responses.migrations/: Directory that stores database migration files, which track changes to your Django models.
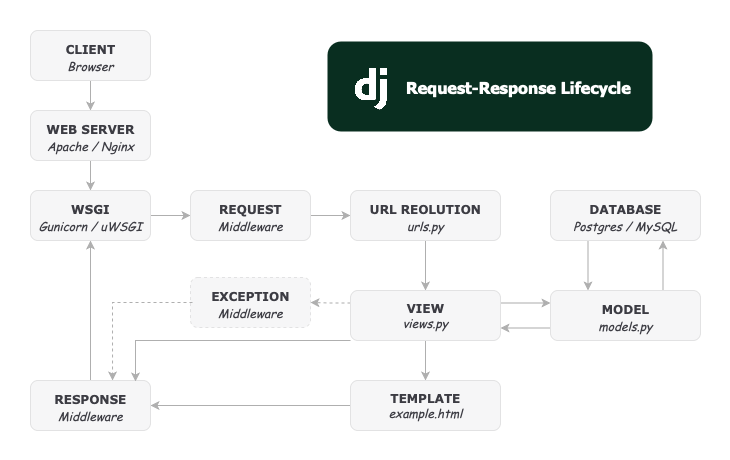
Django Request/Response Workflow

Overview of Django request-response lifecycle:
- Request arrives: A user visits a URL, and Django receives the request via
wsgi.pyorasgi.py. - URL routing (
urls.py): Django checks the URL patterns and maps it to the appropriate view. - View execution (
views.py): The view function or class processes the request. It may:- Query the database via models (
models.py) - Perform business logic
- Prepare data for rendering
- Query the database via models (
- Template rendering (
templates/): The view optionally renders an HTML template with the context data. - Response returned: Django sends the generated
HttpResponseback to the user’s browser.
DRF setup
To set up Django REST Framework (DRF) for your project, add it to the INSTALLED_APPS list in your settings.py file:
# my_site/settings.py
INSTALLED_APPS = [
    ...
    'rest_framework',
](This enables DRF in your project, allowing you to build RESTful APIs.)
