Lifecycle Hooks
Every Vue component instance goes through a series of initialization steps when created. It needs to set up data observation, compile the template, mount the instance to the DOM, and update the DOM when data changes. During this process, Vue runs specific functions called lifecycle hooks. These hooks allow you to add your own code at specific stages of the component's life.
Registering Lifecycle Hooks
Vue provides several hooks that run at different stages of the component lifecycle. The most commonly used hooks are onMounted, onUpdated, and onUnmounted.
For example, you can use the onMounted hook to run code after a component finishes its initial rendering and creates the DOM nodes:
<script setup>
import { onMounted } from 'vue'

onMounted(() => {
  console.log('The component is now mounted.')
})
</script>
When you call onMounted, Vue automatically links the registered callback function with the current active component instance. This requires these hooks to be registered synchronously during component setup. You should avoid doing something like this:
setTimeout(() => {
  onMounted(() => {
    // this won't work.
  })
}, 100)
This rule does not mean the call must be placed exactly inside <script setup>. You can call onMounted() from an external function as long as the execution sequence remains synchronous and starts from within the setup phase.
If you are using the Options API instead of <script setup>, all lifecycle hooks are called with their this context pointing to the current active instance. You should avoid using arrow functions when declaring lifecycle hooks in that scenario because you will lose access to the component instance via this.
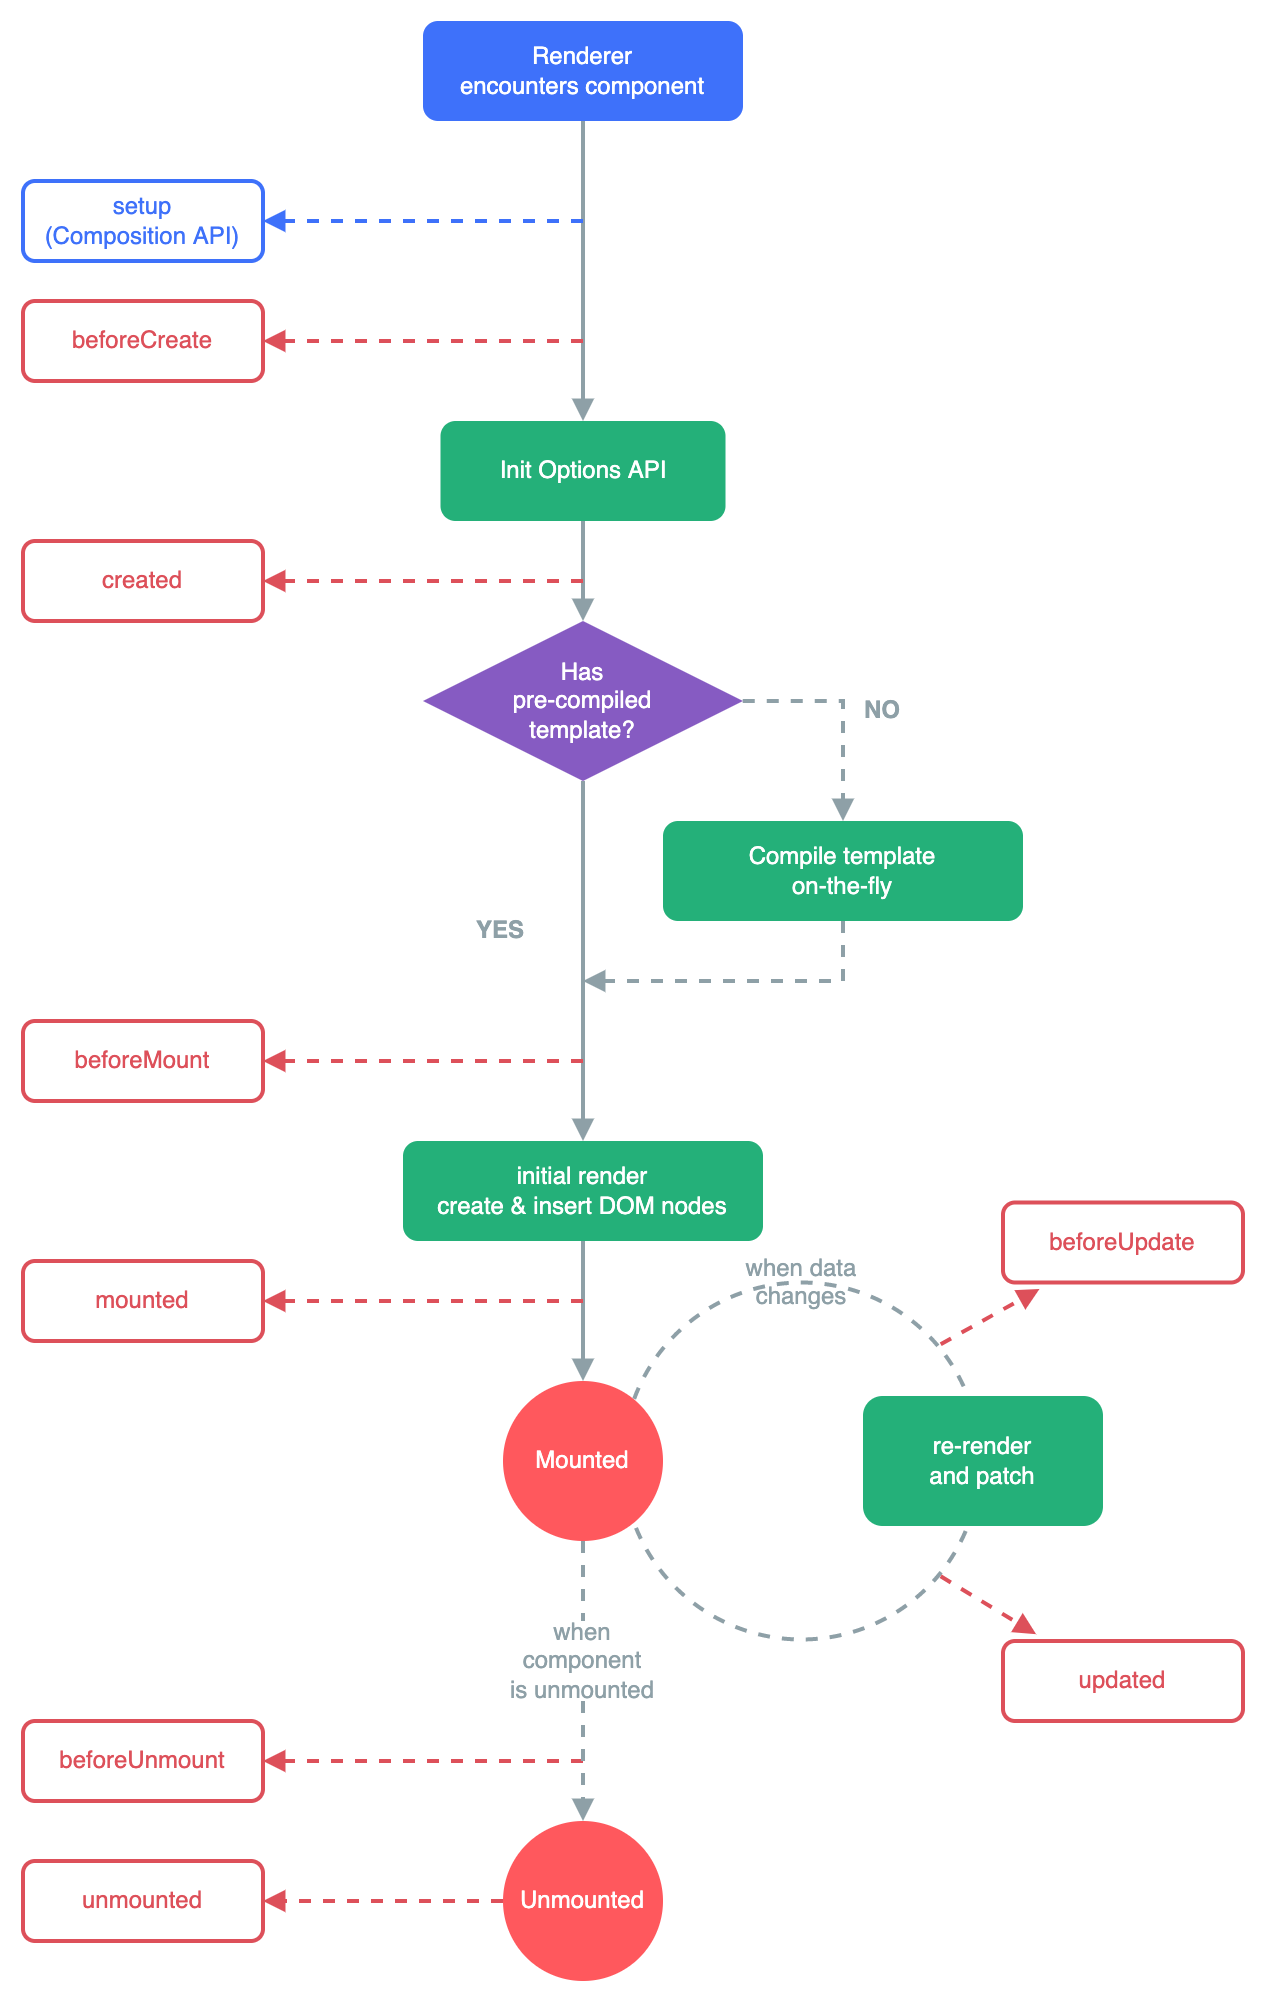
Lifecycle Diagram
The following diagram illustrates the component instance lifecycle. You do not need to understand everything but this will serve as a helpful reference as you learn and build more applications.
Real-World Examples
The examples below demonstrate how to use these hooks in a Blog Post Editor component. This component allows users to write a post, automatically saves drafts to localStorage, and registers a global keyboard shortcut.
onBeforeMount
NOTE
Hydrating a component means populating its reactive state with data from an external source (like localStorage or an API) before it renders for the first time.
Runs after reactive state is initialized but before the DOM is created. Use it to hydrate state from an external source before the first render - for example, restoring a saved draft.
<script setup>
import { ref, onBeforeMount } from 'vue'

const title = ref('')
const body = ref('')

onBeforeMount(() => {
  const saved = localStorage.getItem('draft')
  if (saved) {
    const draft = JSON.parse(saved)
    title.value = draft.title
    body.value = draft.body
  }
})
</script>
onMounted
Runs after the component is inserted into the DOM. Use it whenever you need a real DOM node - for example, auto-focusing the title input so the user can start typing immediately.
<script setup>
import { ref, onMounted } from 'vue'

const titleInput = ref(null)

onMounted(() => {
  titleInput.value.focus()
})
</script>

<template>
  <input ref="titleInput" placeholder="Post title" />
</template>
onBeforeUpdate
Runs before Vue patches the DOM in response to a reactive change. Use it to capture the current DOM state before it mutates — for example, snapshotting the previous word count for a "words added" indicator.
<script setup>
import { ref, onBeforeUpdate } from 'vue'

const body = ref('')
let previousWordCount = 0

onBeforeUpdate(() => {
  previousWordCount = body.value.trim().split(/\s+/).filter(Boolean).length
})
</script>
onUpdated
Runs after Vue has finished patching the DOM. Use it to react to the new DOM state — for example, persisting the latest draft after every edit.
<script setup>
import { ref, onUpdated } from 'vue'

const title = ref('')
const body = ref('')

onUpdated(() => {
  localStorage.setItem('draft', JSON.stringify({ title: title.value, body: body.value }))
})
</script>
WARNING
onUpdated fires after any reactive state change, not only the data you care about. Prefer watch when you need to react to a specific piece of state.
onBeforeUnmount
Runs just before the component begins teardown — the instance is still fully functional. Use it to cancel in-flight work — for example, aborting a pending save request when the user navigates away.
<script setup>
import { onBeforeUnmount } from 'vue'

let saveController = null

function savePost() {
  saveController = new AbortController()
  fetch('/api/posts', { signal: saveController.signal, method: 'POST' })
}

onBeforeUnmount(() => {
  if (saveController) saveController.abort()
})
</script>
onUnmounted
Runs after the component is fully removed from the DOM. Use it to clean up side effects that live outside Vue — for example, removing a global keyboard shortcut registered in onMounted.
<script setup>
import { onMounted, onUnmounted } from 'vue'

function handleKeydown(e) {
  if ((e.ctrlKey || e.metaKey) && e.key === 's') {
    e.preventDefault()
    savePost()
  }
}

onMounted(() => window.addEventListener('keydown', handleKeydown))
onUnmounted(() => window.removeEventListener('keydown', handleKeydown))
</script>
onActivated and onDeactivated
These hooks only fire when a component is wrapped in <KeepAlive>. Use them to pause and resume background work rather than tearing it down entirely — for example, an auto-save interval that should run only while the editor is visible.
<script setup>
import { onActivated, onDeactivated } from 'vue'

let autoSaveTimer = null

onActivated(() => {
  autoSaveTimer = setInterval(saveDraft, 30_000)
})

onDeactivated(() => {
  clearInterval(autoSaveTimer)
})
</script>